March 28, 2009

Lots of fun with a little plastic ring.

Well, while I'm patiently awaiting the arrival of my Tatters Across Time program, I decided to do some experimenting.


Inspired by some posts that can be found on Jon's pattern page, these cool earrings were made on small plastic rings with some Flora size 20. Honestly, I was so surprised at how well they turned out! I tried one with a larger ring and a little flower in the middle but I haven't perfected that one yet.


My favorite part about these is the fact that it's useful tatting! I have decided to take the 25 motif challenge again, and this time I am challenging myself to do "useful" pieces. i.e. gifts or items that will be used for something specific, like the hanky bonnet. We'll call that #1 and these earrings #2. I finished out my last challenge with a box full of little motifs that really have no use as of yet, I'll keep them around for scrapbooking and making cards, and maybe someday they will see some use.
In other related news, the aforementioned hanky bonnet is assembled and ready to go, I'll find a doll or something to model it soon.....unless I get lazy and just wait until I can post a picture of the new owner wearing it of course. She should be here in 6-8 weeks! Yay! So, with that being said, if I drop off the face of the earth and fail to post for awhile, you'll know why!

March 25, 2009

Anyone want to proof this for me?


It all started with my search to find an edging for the hanky bonnet. I tried samples of several edgings, including the one that follows, before settling. Anyway, this is one of the tries I made. It is a greatly modified version of a pattern from the book Tatting Patterns by Julia E. Sanders, which is a reprint of the old Priscilla #2 I think. I changed the stitch count drasticly to get it to be the same scale in a larger thread, and I took out a gazillion joins that became redundant in the size 20 I wanted to work with. So, I rewrote the original pattern into shorthand, reworked it, and then re wrote out the pattern for what I had done.....just to keep as reference. Well, in the end it turned out to be a good exercize in translating for me. I tried to be meticulous about every Reverse Work and Switch Shuttles and all that. I've tatted through my final draft of the pattern and it seems to be all ready to go so I thought I'd share it after all that work! I'm also hoping to entice an experienced tatter to tat through the pattern and make sure it will make sense to the general tatting population. If you'd like to have a go, the pattern is below, as well as two samples. The Purples shows it in two colors and is tatted how I envision it. The red is there to show how it looks in one color, but should not be used as a reference- I did that piece while I was working out the pattern the first time.


Other notes about the pattern-


I do most of my tatting with a frontside and backside---- the rows in Italic can be done in reverse stitch order ( just start with the second half of the double stitch and then do the first half to count as one stitch and continue ending with the first half double stitch. ) If you prefer, just work the Italic rows like you normally do and it won't change the pattern.


I don't like to assume anything about those that might use the pattern, so I might have put in notes to RW or SS that might be intuitive for some with experience or those who us a picture or diagram, but I remember it being helpful to me in some situations to have those noted accurately.


Ok, here it is!


_________________________


_________________________

Krystle's Priscilla edging


R = ring
CH = chain
- = picot
p - picot
+ = join
j = join
RW = reverse work
DNR = do not reverse work
SS = switch shuttles

R: 5-5. RW, SS
R: 3-2-3. DNR, SS
CH: 5-5. RW,
R: 5+5. (j to first R) DNR
R: 5-3-3-5. RW
*CH: 4. RW
R: 3+5-5-3. (j to last p of prev. R) RW
CH: 4. RW
R: 5+3-3-5. (j to last p of prev. R) DNR
R: 5-5. RW
CH: 5+5. (j to opposite CH) RW
R: 5+5. (j to p of last R) RW SS
R: 3+2-3. (j to last p of opposite R) DNR SS
CH: 5-5. RW
R: 5+5. (j to same p of last 5-5 R) RW, SS
R: 3-2-3. DNR SS
CH: 5-5. RW
R: 5+5. (j to same p of last 5-5 R) DNR
R: 5+3-3-5. (j to last p of opposite R) RW

Repeat from * to desired length

____________________________________________


Any critique on how the pattern is written would be hugely helpful!

March 23, 2009

Hanky Panky!


Well, I got over the scalloped edge hanky intimidation, however, I will be getting a straight edge hanky next time.


This is the first hanky I have done, in fact it's the first edging I have ever attached to anything. And I lamented over what pattern to use, I tried samples of several different edges and threads before settling on this. I got the idea from a lesson a few weeks ago from the online tatting class, we talked about josephine knots and I really fell in love with them. Special tip from me: Drop your shuttle through the ring before you close josephine knots, it makes them lie flat.

The next step of course is to sew this into a bonnet for new baby on the way. The end goal is that she will have it as her "something old" on her wedding day and be able to sew it back into a bonnet for her baby. I'm very sentimental and love heirloom type things. In fact, I had contacted my Great grandmother to see if she would send me a piece of her tatting, and come to find out great grandma doesn't tat much anymore and only did a little of it in the first place. Oh well. I do know that my grandmother has a piece that Great grandma had tatted, I've seen it in her cabinet.....I might have to persuede her out of it. Or duplicate it and switch it out....what do you think Grammie? :-) Anyway, all that is to say that I am not a part of a great tatting legacy like some. Great grandma and my mother were both dabblers I guess you could say ( Mom edged a sweater vest for me in kindergarten as I recall, then I never saw her tat after that). And the aforementioned "grammie" has in fact asked me to teach her to needle tat as she hasn't gotten the hang of shuttles as of yet. So maybe it's a partial revers tatting legacy? I do hope to teach my little girls to tat someday


Edited to add: Sorry! I forgot to post the thread info! It's Lizbeth again, color 118, it's called Bubble gum mix. (since it's a newer thread, some might not know that Lizbeth only comes as size 20, and is available through Handy Hands) And for those interested the pattern is just rings and chains with 4 stitches between picots/joins. Two shuttles are used to throw the josephines off the chains.

March 17, 2009

Finished the challenge!


I'm done with my 25 motif challenge!
For those not familliar, the 25 motif challenge is just a way for tatters to stay motivated I guess, and the goal is to tat 25 different things in a year. There is a blog dedicated to those participating, I'm too lazy to make a link right now but I'm sure you can find it on the right side of my blog somewhere as they update it regularly with everyone's efforts. The fun part has really been seeing the different things people have done, and I've found several patterns I like in the process. Now, it's not a competition (except with yourself I suppose) and I'm actually surprised I finished in two months. I've been tatting like gangbusters knowing that very soon, in about eight weeks in fact, I'll run completely out of personal time (new moms know what I mean!). It's kind of my unwinding time at night, after Ivria goes to bed and before Jim gets home from work. Nobody needs me at that point of the night.
I plan on keeping updated with the challenge blog just to see what everyone is up to, and maybe I'll start myself a second round of the challenge. We shall see what the next few pre-newbaby months bring.
P.S. It was late last night when I posted this and I realized I left some information out! The bookmark pattern is from Jane's Blog, she has a friend named Jane who modified the pattern from a Burda book I believe. I made it to fit inside that plastic ruler that I got from Lacy Susan, I'ts so cute and it fits in my little tattingbag just perfect! Tatted in Lizbeth countryside.

March 14, 2009

8 weeks, see any difference?


This January, after about a 2 year hiatus from tatting, I picked up my shuttles again and made this bookmark. Which one you ask? Well, I'm hoping at least some of you can tell...... The other was tatted this week. The same exact Flora size 10 thread was used for both. Just thought it might be a cool illustration to see if I've improved much in the past 8 weeks. Also this is #24 for my challenge, I didn't count the first one I did because I didn't know about the challenge at the time. I want to tat something cool for # 25, Maybe the hanky edging? I'm scared though, I bought a scalloped hanky and for some reason it's intimidating me! Kind of like those Geico commercials out right now, with the stack of bills.....staring from across the room......

March 10, 2009

I took the leap!


I did it, I sent off my form for the Tatters Across Time program. I've heard good things about it, and I'm very excited to start. Turns out that one of the gals involved lives not more than 40 minutes from me! How cool is that! Local tatting gals! Yay I'M NOT ALONE! :-)
Here is my latest bookmark- pattern courtesy of Lenore English. And now that I look at the pic I see that it needs some blocking. Lizbeth thread again of course....(I only have 16 colors lol! Enough to keep me busy for a little while.) Motif number 23 for the 25 motif challenge, now I really need to think about starting the edging for new baby's hanky bonnet. She will be here in about 10 weeks! Good news is that my mama will be flying in for a month, so I may get some tatting done after the birth, who knows. I'm still convinced that with my full array of baby slings and wraps, I just might figure out how to tat and nurse a baby at the same time.

March 6, 2009

I know it's early....

Happy Saint Patties Day! Well, not yet, but you get the idea
:-)


So, who exactly was ST. Patrick anyway? Click here to find out!


This is motif number 22 for me, it is a Rozella Linded pattern that I found available in the Celtic Tatting yahoo group. Done in Lizbeth thread, it's also my answer for the monthly challentge on etatters. And, this is the first time a bead of any sort has made it near my tatting.

Spinning wheel goes round, along with my obsessiveness!

Ladies and gentleman, for motif number 21 of my challenge.....


may I present to you an all too familiar pattern....

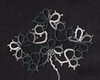
It's Mary Konior's Spinning wheel Glass Mat from Tatting with Visual Patterns!

This is a pattern that I have been waiting to try! I first saw it on someone's blog, and just had to find it! You see, I'm sort of a pattern hog. I have a 2 1/2 inch 3-ring binder full to overflowing of patterns from various internet sources. So once I discovered the book it was in I was just itching to get my hands on it! And I must say, the book is a must have. There are so many interesting patterns and helpful hints! This pattern in particular is pure genious to me. It caught my attention because of it's simplicity and it's innovation. I'm in love. Sigh. I'm quite in love with the thread, some of my favorite colors, it's Countryside Lizbeth from handyhands. So far this is my favorite piece ever. Funny thing---while tatting it I realized how Obsessive Compulsive I've become about the work having a specific front side. I don't know why I started that, something about joins in Georgia Seitz' Tatting Talk book maybe, but I just began experimenting with different joins, and somewhere along the line trained myself to tat all the chains in the simpler patterns with stitches in reverse order. And, I'm thinking that's why I had so much trouble with my first attempts at Iris Niebach designs. In most traditional tatting the rings and chains kind of keep to their natural positions, but Iris reverses stitch direction and pretty much makes her own rules -which is why her stuff is so fabulous- but I was frustrating myself when I'd try to keep all of the chains in reverse stitch order instead of really paying attention to where the front side of the work is :-) For instance, in this Konior pattern, one of the chains reverses direction at the edge, so about half the rings and half the chains ended up being stitched in reverse. (and by stitched in reverse order, I mean that when you are looking at the back of the work, you start with the second half of a double stitch and finish with the first half.) It was frustrating at first, but I love the result, and now I just do it unconciously.

Anyway, thus began my obsession to make joins invisible on the front side. So I started doing a down join followed by the second half of a DS for my joins, which is close to invisible. And then an off topic comment from Georgia in the online class sent me headfirst into a love/hate relationship with the LHPJ, or the Larks Head Picot Join. At last, I had found it! the invisible join! Ah it looked so lovely when done properly, but my was it a pain in tha patootie! For me to get it right it involved pulling up a loop and then somehow folding it over and shoving my big fat Lacis shuttle through two loops of thread at the same time, and then straightening it out and putting the work back on my hand to continue. It was fiddly to do in the first place, and I just couldn't get the first half to snug up properly. So, I spent some time working it out, and I came up with a two step way of doing it in which I pull up a loop for the join, twist it in a specific direction, then snug it down. Then I go back in the picot and pick the thread up again and do a half twist the other way and finish the join. It's much faster for me and so I got back on the love train for the LHPJ.... It wasn't long before I ran back into the backside of the work, and then had to figure out how to do it upside down and in reverse to make it look right on the front of the work! But, it works like a charm for me, and now I do it pretty much every time. The trickiest part is remembering to count the LHPJ as the next double stitch in the pattern, otherwise you get extra stitches all over the place.

Sometime after that, I ran into mention that dropping your shuttle through the ring before you close is a good idea, and I couldn't figure out why until I noticed that all my frontside/backside efforts were making the bases of my rings turn inward on the frontside. But on the back they were fine! So, I tried it, and lo and behold my rings were laying nicer after dropping the shuttle through each ring before closing.......but that solution caused yet another problem.........I was visually losing half a stitch at the base of each ring. And as I found my dark obsession growing deeper, I discovered that if I add a first half of the double stitch at the end of the ring AND dropped the shuttle through before closing, I visually get all the stitches in place, the ring doesn't turn inward and lays perfectly flat! YAY! And of course that means you add a second half DS when tatting a backside ring, and you don't drop the shuttle through.......

Too complicated yet? I don't know. Maybe I'm making craziness, but I am so happy with the results, I just can't bring myself to do a regular join, or tat my chains like I used to. In the end I think I added like six new processes to my tatting, and I never knew I was such a perfectioninst...... Maybe I'll have to post detailed pictures to convince you that I'm truly not Mad. This is just the method......er.... to my ...um.........madness

And, we had great news today that I passed my glucose test and am completely free of gestational diabetes! YAY! I've been doing a happy dance all day. This means that I'm at this point still able to deliver my baby at the birth center, and I can enjoy my waterbirth in the calm uncomplicated surroundings. Natural childbirth truly is my "happy place"....and I have had women call me mad when I say that :-)

Gold stars to those of you who made it all the way through my wordy nonsense.....

March 4, 2009

The never ending Doily!

I swear this thing took twice as long as it should have! I kept screwing it up, and spent probably one third of the time going back to fix mistakes. But I think it's beautiful, and the colors couldn't have been cooler! By the luck of the draw the dark red presented on all eight points all on it's own. How does that happen :-)

It still has two major Boo-boos, I made a chain on the outer part too short, and I missed a ring in there too.


Part of the reason it feels like it took so long is because I usually stick to smaller things. I just love Iris Niebach's designs though, this is Beatrice from her book Tatted Doileys. At the same time I have been working on her TIAS, and I continued it on past the last day. I don't know if I'm in a mood to finish it to all eight points yet, but it will probably get there someday.


I did get to start a pattern that I have been itching to get to, the spinning wheel glass mat design from Tatting With Visual Patterns. I ordered some thread specificaly for it from HH, some beautiful varigated blue-green-teal Lizbeth that is working up nicely. I do really like the Lizbeth, it feels a touch finer than the Flora 20, and it's a bit softer too, which makes it perfect for me. It's a good thing I like it because I ordered a whole bunch of the colors! Here is that TIAS in Lizbeth, please ignore the inconsistency in the Long Picots, I couldn't decide how long worked best....


The varigated is called carousel #112, and the purple is #682. For some reason the Lizbeth is way easier for me to work with. I'm crazy inconsistent with the Flora sometimes, there is just enough difference in texture I guess. Anyway, if you haven't yet you should try the thread. The colors are so great, 72 or something different colors available! And it's on sale for $3.75 a ball, and if you are a Handy Hands newsletter subscriber you can get free shipping and a discount coupon! Wowee I can't say enough about that company, I'm a loyal fan of theirs. GO HANDY HANDS!

As far as the 25 motif challenge goes, Iris' TIAS is number 19, and the doiley is #20. I'm almost sad to be this close to finishing though, it's kept me motivated. Maybe I'll have to just start over when I reach 25?

AND.....No news is good new on the blood sugar test they say. I haven't yet received a call, so all may be well. I'll hunt down the test results tomorrow if I don't hear from them. A big thank you to all of you who left encouraging comments about this! It helped get me through. And realizing once again of course that if God is big enough to move mountains, by gosh he can move blood sugar levels too!

March 2, 2009

It's found a home.

Welcome all, to my tatting central. In my own little corner stands a little side table with drawer and cabinet. Within are held the wonders of thread and shuttle. And now, there is a new permanent addition to the top of tatting corner....


It's my little teal medallion, proudly displayed in an acrylic coaster.

Taaa-Daaaa!

Nestled amongst various projects, including Iris' current TIAS, and my little tatting bag, stands my coaster. It's my little bit of happiness atop my table :-) Now as I tat and drink my glass of milk I can know that I'm contributing to the preservation of my IKEA furniture, which can be passed down, along with this fabulous heirloom coaster, to future generations of milk-drinking tatters.

:-)

Anyway, I do hope Iris get's another piece of the TIAS (Tat It And See) posted tonight. Lord knows I'll need it tomorrow! I failed my glucose screening this week, so in the morning I get to go to the lab and take the three hour glocose tolerance test to prove to them that I don't have gestational diabetes. (well, that's the way I see it anyway :-) As far as I know this test involves much drinking of concentrated orange soda substance, and many holes poked in my arm.

Wish me luck, because if I fail this test, I won't be able to deliver at the birth center, and I'll have to deliver at the hospital......

That would make me very sad.